Houston based Prime Systems provides school districts with complete computer equipment and classroom systems that meet educator’s needs. When Friendswood ISD asked Prime Systems to design, build and install their new boardroom, they contacted TEKVOX for a complete solution. As part of our Drop-in solutions, we also provide the customer with all of the equipment, software and system commissioning to complete a job.
The customer’s requirement included a Dias microphone system and three video projectors. They also required that the room could be used as a board meeting or as three separate rooms. For control, the customer wanted three touchscreen controllers and a simple touchscreen to control each projector for the individual rooms. To achieve this we designed a system with our new DSP Microphone system and a TekFlex-16. The DSP Microphone system greatly simplifies the installation and setup of the system by using digital Microphones daisy-chained together with their own mix-minus speaker system. For audio distribution to the room we used a Biamp TesiraForte TI. The Tesira is used to provide the separate or combined audio and volume control for the rooms.
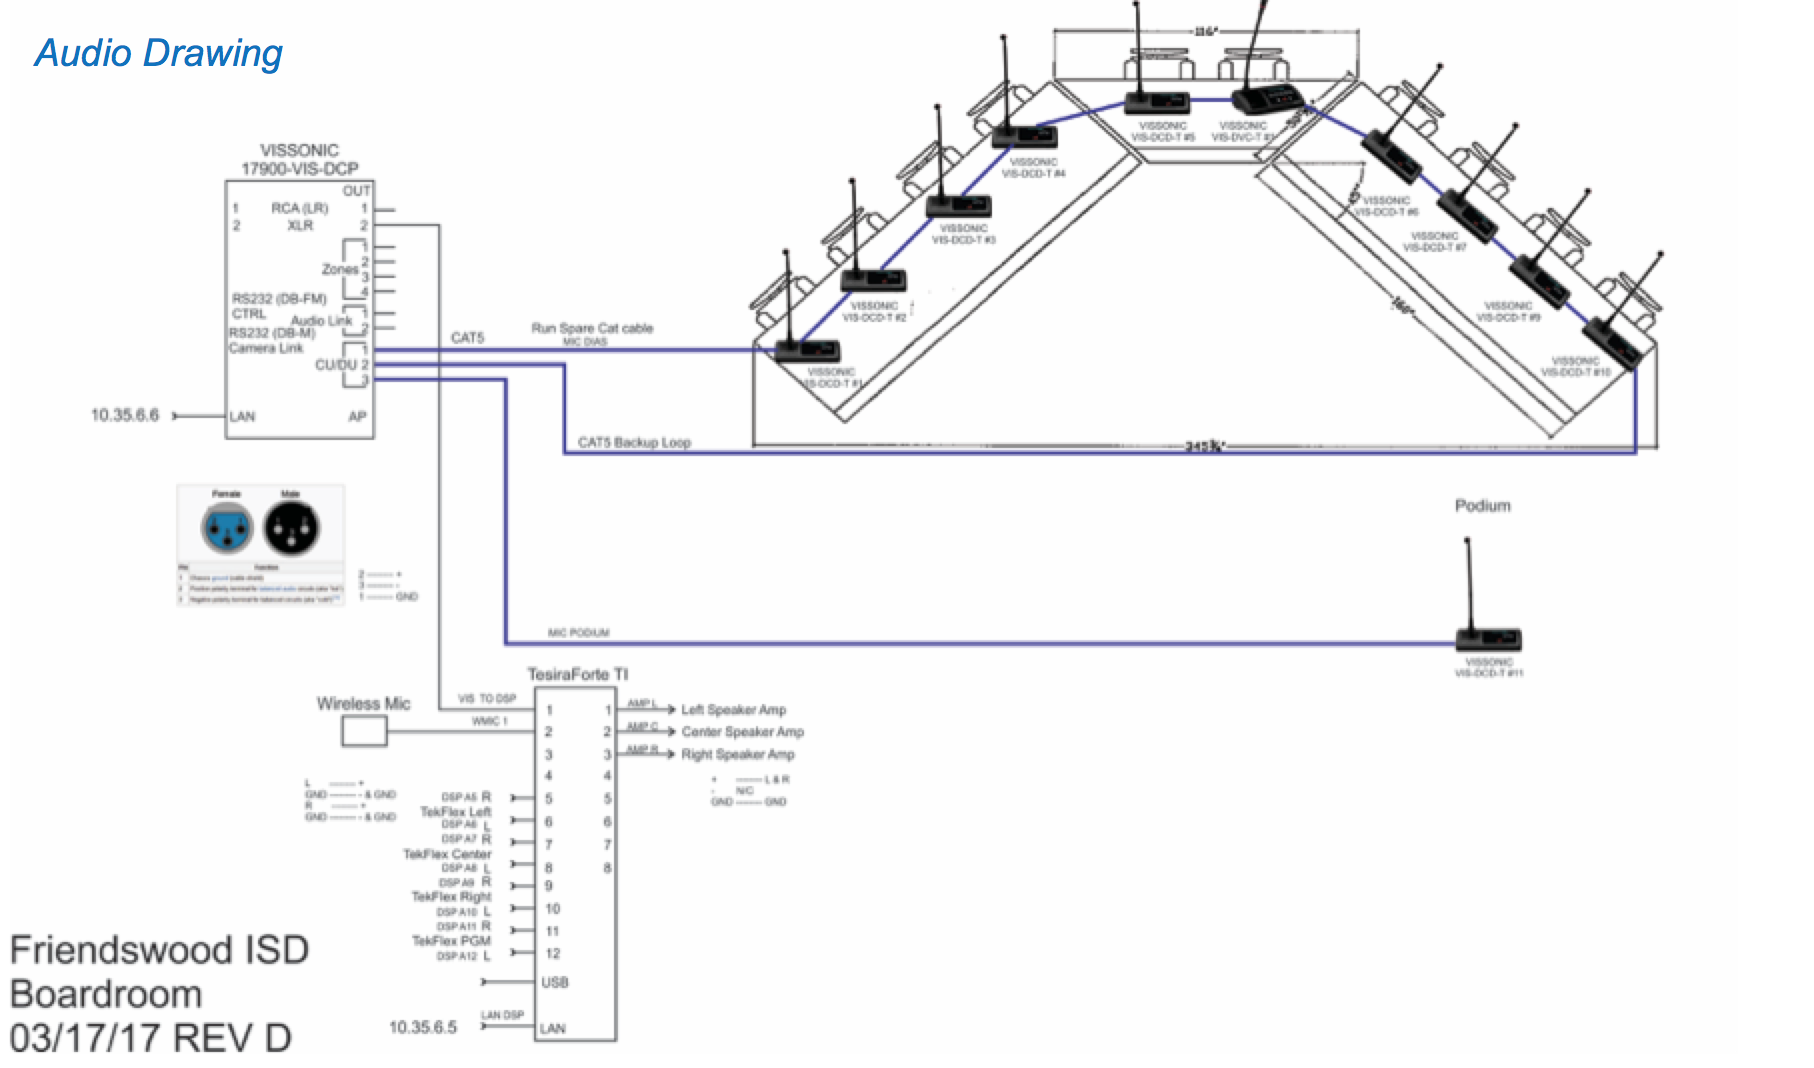
Video Drawing
For video we used the TekFlex-16 modular seamless matrix. This allows for us to pick and choose the input and output card types and their position. Each room has an HDMI/VGA wall plate with an HDBaseT connection. At the Dias there is a PC connection that allows for both HDMI and VGA. In the podium is a TEK 51T used for connection of an external laptop.
At each projector is a TEKVOX CB-1A Ceiling box containing a TEK 3 device controller, HDBaseT Receiver and Audio amplifier. The CB-1A comes preinstalled with this equipment and is prewired by TEKVOX. This makes it easy for the installer to drop the system in and connect cables.
System Operation
The system is designed to be a decentralized control system allowing each touchscreen controller to independently operate the system. Unlike other systems using a central control system where all devices are controlled by a single controller, anyone of the touchscreen controllers can operate the system by themselves. This allows the touchscreen controller to have the same program and if any of the touchscreen controllers fail there are still two others that can operate the room. A typical decentralized control system cannot work with multiple touchscreens at the same time or they cannot synchronize their pages and feedbacks together.
The TEKVOX solution that allows multiple touchscreen controllers working together is achieved by using TEK 3 device controllers. The TEK 3 operates independently by communicating directly with its connected devices. A unique protocol called TekEzLink allows up to four touchscreen controllers to establish a connection to each TEK 3 and synchronize their feedback. By using TEK 3s, the control system becomes decentralized by creating a distributed processing system. This simplifies the code in the touchscreen controller and makes it easy to replace the video projectors in the future.
The Biamp TesiraForte audio system also allows for multiple touchscreen controls to connect and synchronize their feedbacks. This is achieved by the touchscreen controller subscribing to levels and controls in the Tesira. Any time there is a change made by one of the touchscreen controllers, all of the other controllers will get updates.
Touchscreen Operational Controls
When the system is off, the touchscreen shows a black screen. Touching the screen displays the Logo page for 180 seconds. On this page the version of the project and its connection status are shown at the bottom left. The Service button at the top left gives access to a password protected Settings page. This Settings page is used to update the project or make modifications to the system. Touching the Logo page in the center displays a System on popup allowing for the system to be powered on in Combined or Separate mode.
When the system is in combined mode, the entire room operates as one. All of the speakers will have the same audio. There are three video projectors located Left, Center and Right. These are shown as a graphic of the projector with three different graphics to indicate its power state.
The system has six sources and “None” that can be selected and sent to any projector, All or the Program Audio. Once a source is selected, its button changes to an on state displayed as bright white and can be routed to by pressing the Projector, All or Program Audio button. The text of a source routed to a projector is displayed above the projector. If a projector is not on when a source is routed to it, the projector powers on. The sources include; Wireless BYOD, PC Podium, Left Wall Plate, Rear Wall Plate and Right Wall Plate. Use the “All” button to send to all projectors and the program audio.
For room audio control the “Volume” button displays the Volume control popup. From this popup the Program and Speech levels and mutes can be controlled. The “Program Level” adjusts the selected source routed to the Program Audio. The “Speech Level” adjusts the microphone level in the room. Control of these levels can done using the up and down buttons or dragging the level.
The DSP Microphone system has a push-to-talk button and up/down level controls for its internal speaker. Each microphone maintains its own mix-minus speech reinforcement system by removing its own audio for the speaker. If board members forget to turn off their mic, the “Mics Off” button on the touchscreen controller can be used to turn off all microphones on the DSP Microphone system.
If the wireless microphones cause noise or just need to mute them, pressing the “Wireless MIC Mute” button can be used to toggle the wireless microphones off and on.
If needed, the “Projector Controls” button can be used to display the controls for all of the projectors including their screens. From this page the projector can be powered on and off, the image set to freeze and the screens up and down position set.
When the system starts up in separate mode, each projector and its audio operate independently. Like in combined mode, the source selection is the same except sending to All and Program Audio. Each projector location has its own audio control and operated by dragging the level up or down.
Turning off the system allows for each projector position to be powered off independently or the whole system can be powered off.
TekTouchPad Operational Controls
At each projector position a TekTouchPad is mounted on the wall allowing for independent control of the projector. The TekTouchPad has a logo page and two pages of control buttons. Touching the Logo page displays the first page for allowing the projector to be powered off, source selection and volume control. Pressing the “NEXT” button selects the second page for control of the projector screen. When a source button is selected, the projector will automatically power on and its screen will come down.
Settings
On the Logo page of the touchscreen controller there is a “Service” button allowing for modifications to the system. When pressed, the Service button displays a Password popup to enter the password for the Settings popup. The Settings popup allows for modifications to the system. The administrator can do the following:
Enter System Settings allowing for changing the full screen operation and change the IP address for the equipment.
- Update the Project file from the cloud.
- Change the Warm Up and Cool Down times by clicking on the keyboard icon and selecting the time to change.
- Change the Settings password.
- Select what type a tablet is being used (TXC9, PC iPad or Android).